- b2evolution CMS User Manual
- User's Guide
- Guided Tour
- Guided Tour - Back-Office
Guided Tour - Back-Office
In this page, we will walk you through the Back-Office a.k.a. the Admin Interface. This is the place where you do all the administrative tasks that the general public of your site doesn’t have access to. (Note that you can actually set very granular permissions to determine which features are available to whom but this is beyond the scope of this tour…)
This page currently shows b2evolution v.6.10.7.
- Version 5 is a little bit different (some missing features) but the concepts are the same.
Accessing the Back-Office
In the Front Office Guided Tour, we showed you how to log in. Once logged in as an administrator you obtain this special toolbar (evobar) at the top of every screen:

Just click on Site > Site Dashboard at any time and you’ll access the Site Dashboard, which is the main page of the Back-Office.
admin.php.Navigating the Back-Office
In addition to the evobar which is available everywhere, there are 3 other important concepts to navigating the back-office. You will find most of these on every page of the back-office:
- Navigation Tabs: there are 3 levels of navigation tabs.
- Level 1: each tab leads you to a different area of the back office. The tab of the currently selected back-office area will be highlighted.
- Level 2: a set of tabs that depends on the current Level 1 navigation tab.
- Level 3: a set of tabs that depends on the current Level 2 navigation tab. Some Level 2 tabs do not have a Level 3 tab.
- Collection Selector: this bar lets you select the collection you want to work on. It appears in different sections of the back-office but not all of them. For example, the user management is common to all collections, so there is no collection selection in this area.
- Contextual Manual Link: every page has at least one such link in the top right corner. By clicking it, you will access the relevant page in the back-office reference manual, giving you more information about the tasks at hand. In many cases, you will see additional manual links throughout the page. They lead to more specific instructions. Feel free to click these at any time. They will always open in a new window and you will never lose the current state of the back office page you are in.
Site
This section displays all site related information and enables you to configure site-wide settings that affect the look and feel of the site.
Site Dashboard
When you first access the back-office, you will typically see the Site Dashboard that looks similar to the image below:
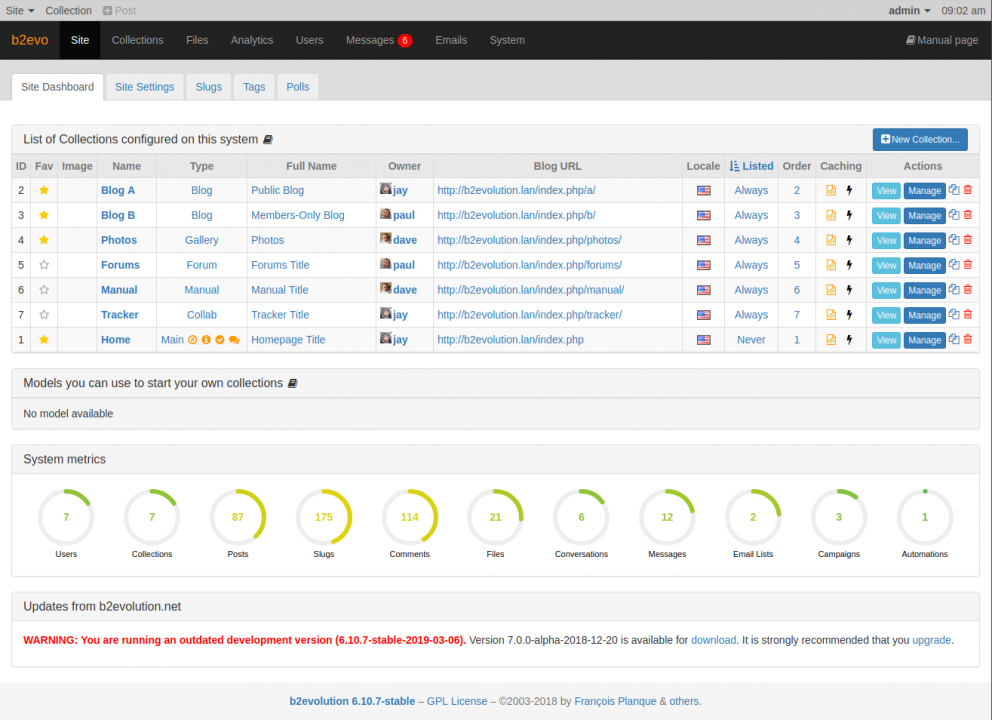
There are 4 important sections on this screen:
- The list of all collections currently configured on your system. This matches the list of tabs you saw in the tour of the Front-Office. Notice the following:
- The "Home" collection is configured as "Never" listed in the "Listed" column. This is why it doesn’t appear as a tab of its own on the Front-Office site navigation bar.
- The "Order" column determines in which order the collections appear in the Front-Office Navigation Bar, as well as in the Back-Office Collection Selector.
- The list of models available for use as template for new collections.
- The system metrics give you a quick overview of how much content there is in the database. In other words: how big this b2evolution is. Note there are no maximums for any of these metrics. However, when some counters get red, you’ll know it might be time to upgrade your web hosting for better performance.
- The updates from b2evolution.net are updated automatically through a web service provided by b2evolution.net. This section will inform you when a new version of b2evolution is available and give you the possibility to upgrade. This section will also alert you (in red color) if a security issue has been discovered on the version you are currently running. In this case it’s recommended to upgrade to the latest stable version as soon as possible.
Site Settings
This is the tab where you configure the site-wide settings for the complete b2evolution website (instead of settings that pertain only to a specific collection):
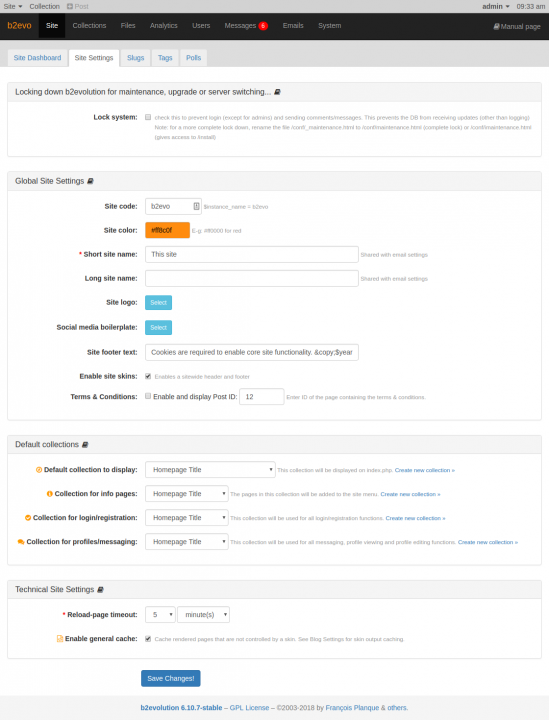
This is where you could change the short name of the site when you’re tired of seeing "This Site" in your Navigation Bar.
This is also where you choose which collection should display by default when users access your site (or the Base URL ($baseurl) of your b2evolution). By default, b2evolution configured to display the "Home" collection.
For more detailed information on other site settings, please see Site Settings.
Slugs, Tags, Polls
Each of these tabs allows you to manage resources that are used across the site:
- Slugs: the last part of an URL that uniquely identifies a page/resource on your b2evolution installation.
- Tags: simple terms (one or multiple words) that can be associated to an Item/Post in order to describe its contents. Maybe used to organize or group together a set of items.
- Polls: questions that users can answer in order to derive feedback or information from the users. Polls can be displayed anywhere on the site with the use of the Poll Widget.
Collections
This section displays collection related information and lets you manage content, and configure settings on a per collection basis.
Collection Dashboard
This tab displays information on the latest contents of the selected collection that may require your attention. You can perform some quick moderation in this screen. A collection dashboard will look similar to the image below:
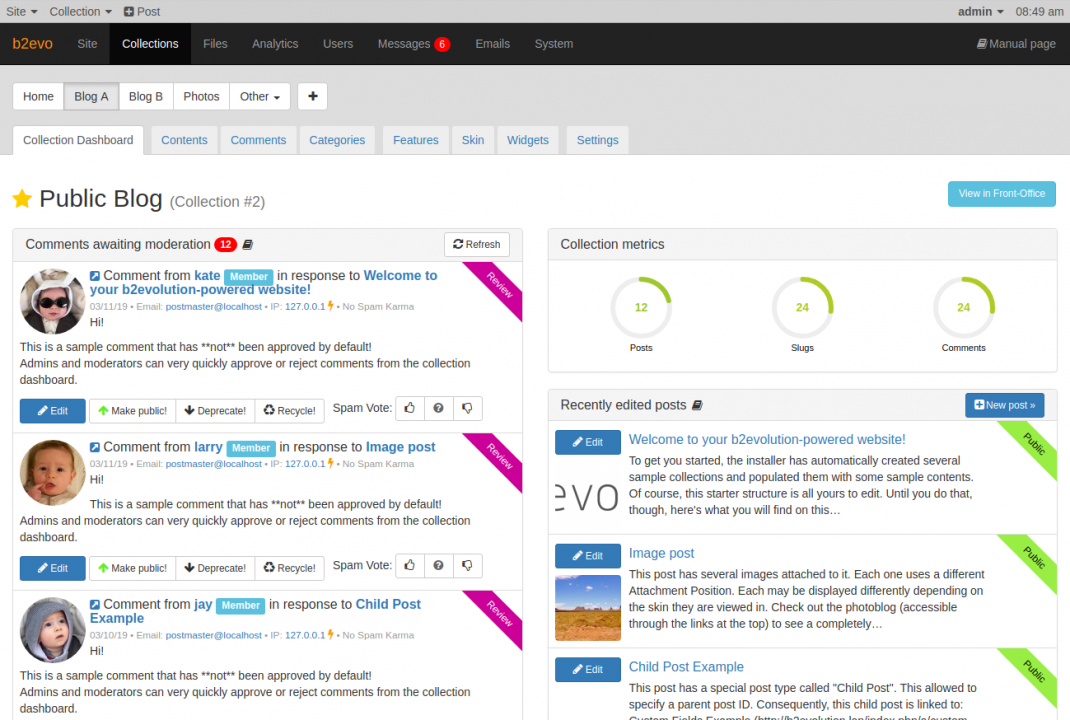
This is a demo collection that has just been set up so the dashboard only shows recently edited posts, comments awaiting moderation and some collection metrics. If this was a forum collection, you may also see some posts that are awaiting moderation.
Collection Contents
This tab is where you manage the contents of the selected collection.
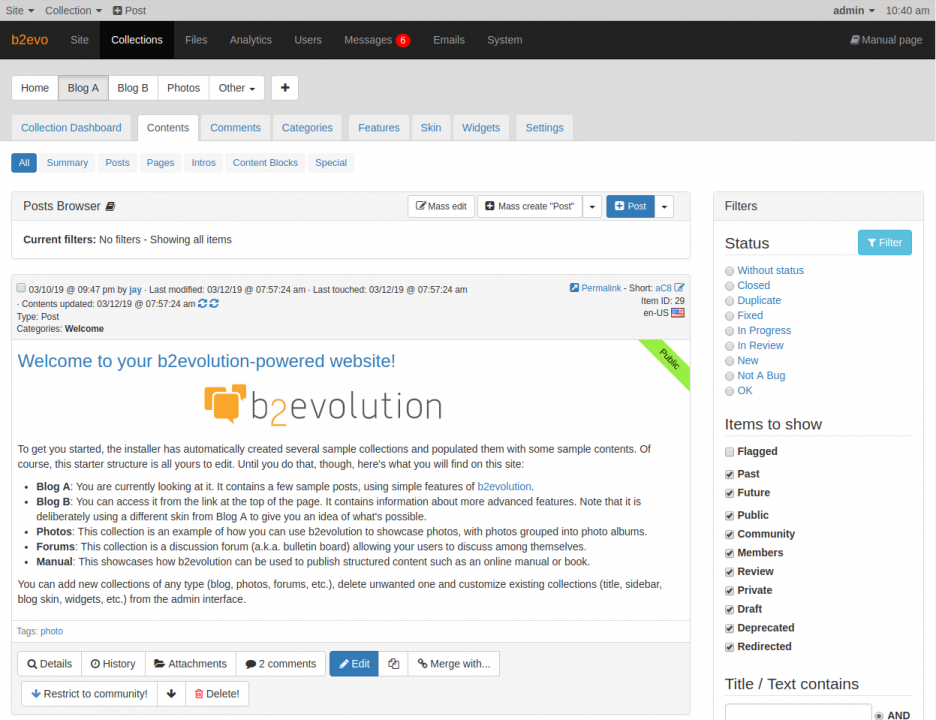
Contrary to the public side or the front-office of your collection, this screen will really show all posts of your collection - including drafts, posts in review, deprecated contents as well as redirected contents.
There is a large collection of available filters on the right side of the page which you can use to locate the contents you need once you have several hundreds or thousands of posts.
We can view the list of contents of a collection in a variety of ways. Some views let you quickly filter the contents by post types:
- Regular posts
- Standalone pages
- Introduction posts (which typically appear on the front page or as category headers)
- Content blocks
- Special items
Other views display the list of contents in a special manner:
- All content view - displays all the contents
- Summary view - displays contents as it will likely appear on social media
- Workflow view - displays additional workflow related properties assigned to items
- Manual view - displays contents based on a hierarchy of categories
Collection Comments
Similar to the Collection Contents tab above, this tab lets you view and manage comments on items that belong to the selected collection:
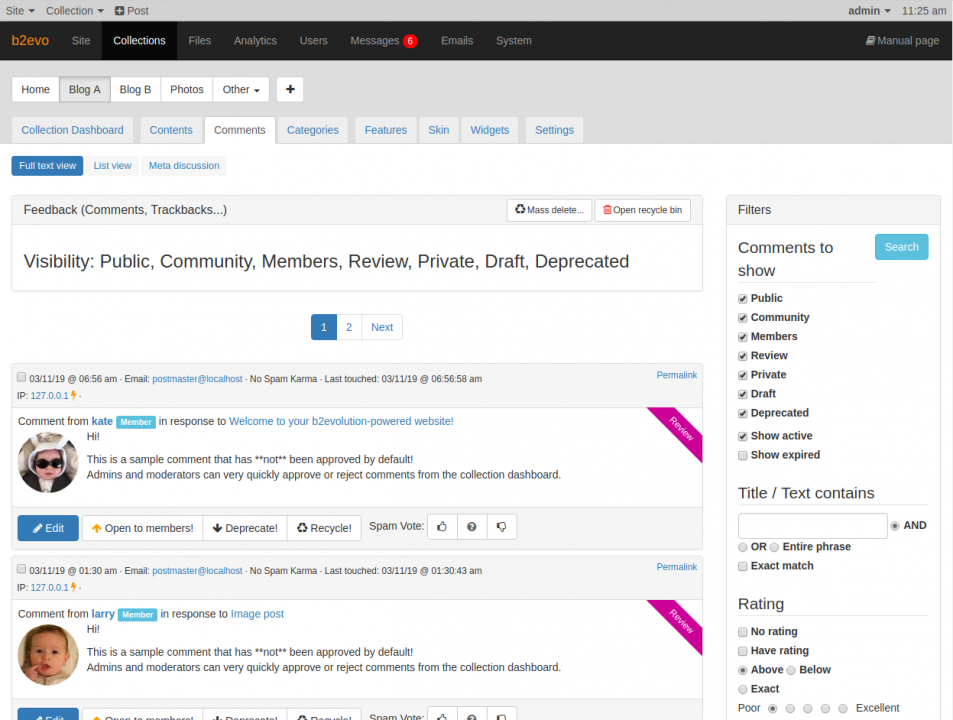
Here again, we have an array of available filters to help you find a specific set of comments. There are also a couple of views to help manage the list of comments:
- Full text view - displays the full text of the each comment
- List view - displays a listing of basic information about each comment
- Meta discussion - displays only meta comments generally available to admins and moderators
Collection Categories
The Collections > Categories tab takes you into the management of Categories for the selected collection.
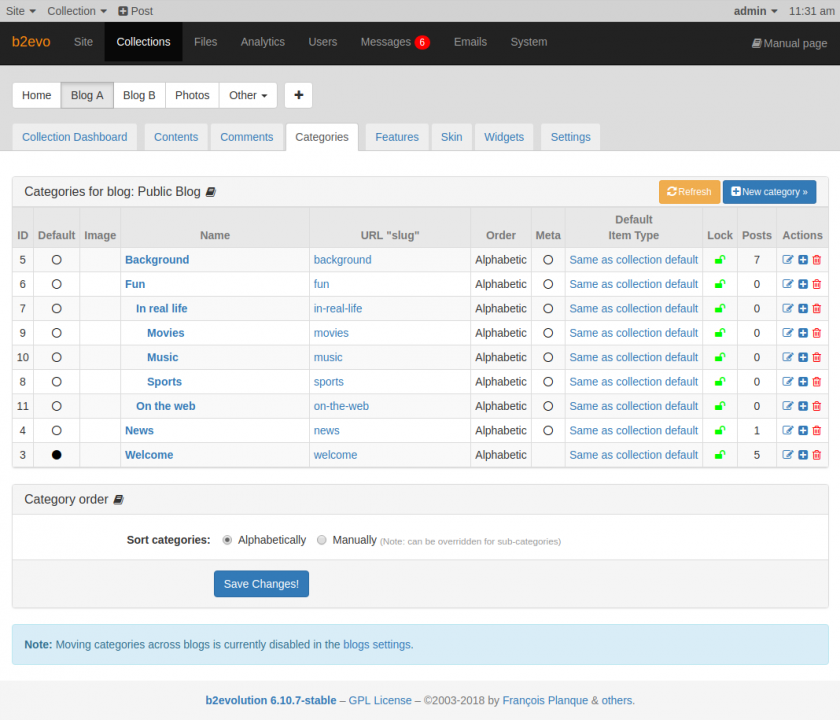
You can create a hierarchy of categories to help you organize your collection’s contents. This is especially useful for manual collections.
Collection Settings
If you click on the Collections > Settings tab, you will see settings that are specific to the selected collection:
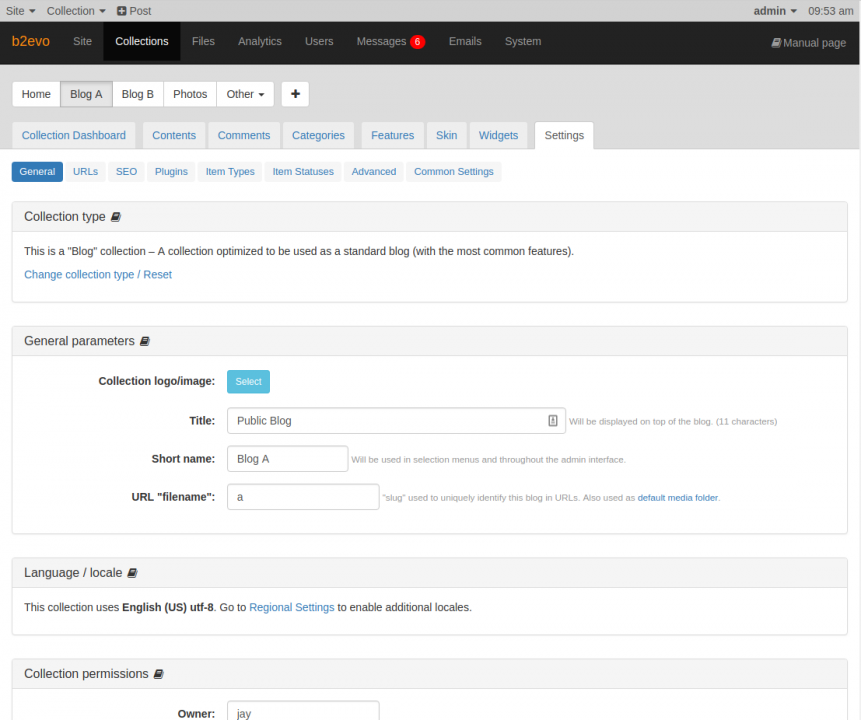
Here you could edit the title of a collection and its short name (the name displayed in the collection selector and other list of collections in the back-office).
This is also where you would restrict the access of a collection to only logged in users. You could even further restrict access by requiring the users to be designated members of a collection before allowing access.
For more detailed information on other collection settings, please see Collection Settings.
Collection Skin (or Theme)
By clicking on the Collections > Skin tab, you will access the skin settings specific to the selected collection:
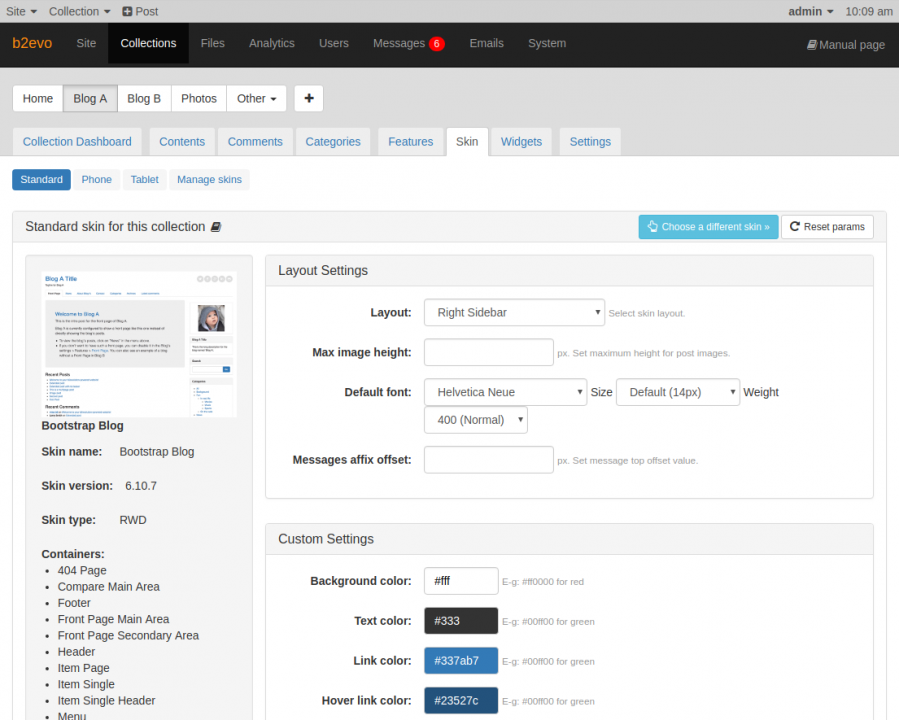
The skin (some systems call it a "theme") is what allows a specific style of presentation for your collection. By using a different skin, you can radically change the style of a collection. You might actually want to click on "Choose a different skin" button in the top right in order to bring up the skin selector:
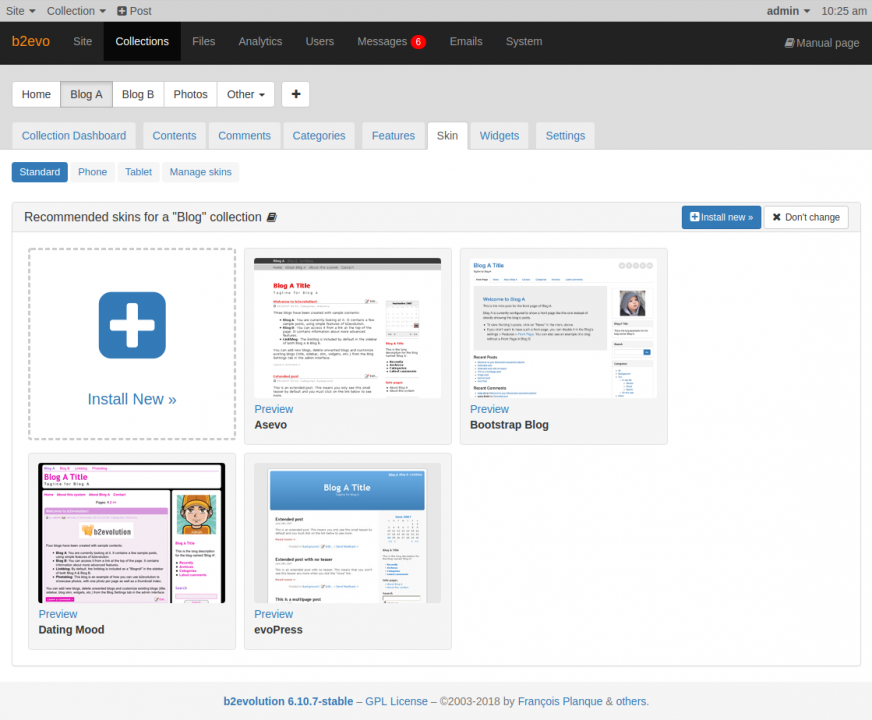
Only skins that are currently installed on your system are displayed here. You could download and install additional skins from the Skins Repository or from third-party sites.
Collection Widgets
The Collections > Widgets tab lets you access the widgets manager for the current collection:
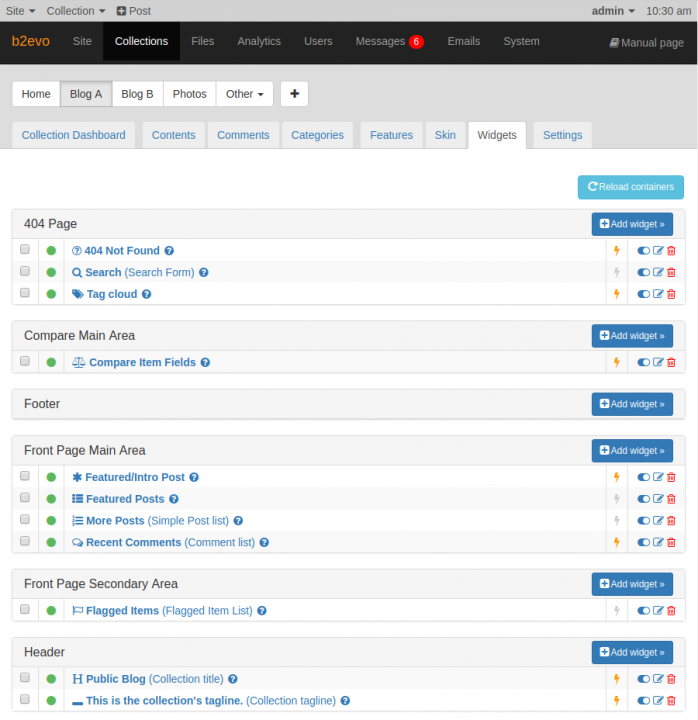
Widgets are grouped into Widget Containers. Each skin has a place for these containers. (Though, some skins may not use exactly the same containers as others). It’s then up to you to decide which widgets you want to appear in each container and in which order…
For example, you can see that the "Header" container contains 2 widgets by default:
- The Collection Title
- The Collection Tagline
For example, you might remove the tagline widget if you have no use for it.
If you scroll down, you will find the "Sidebar" container which is the source for the right column on "Blog A" for example. You might remove the profile picture widget. You might also move the Categories list widget to the top of the sidebar (You can do this by dragging and dropping the widget).
File Management
b2evolution includes its own File Manager, allowing you to manage all the media files (images, videos, sounds, documents, etc.) that you might want to attach to your items:
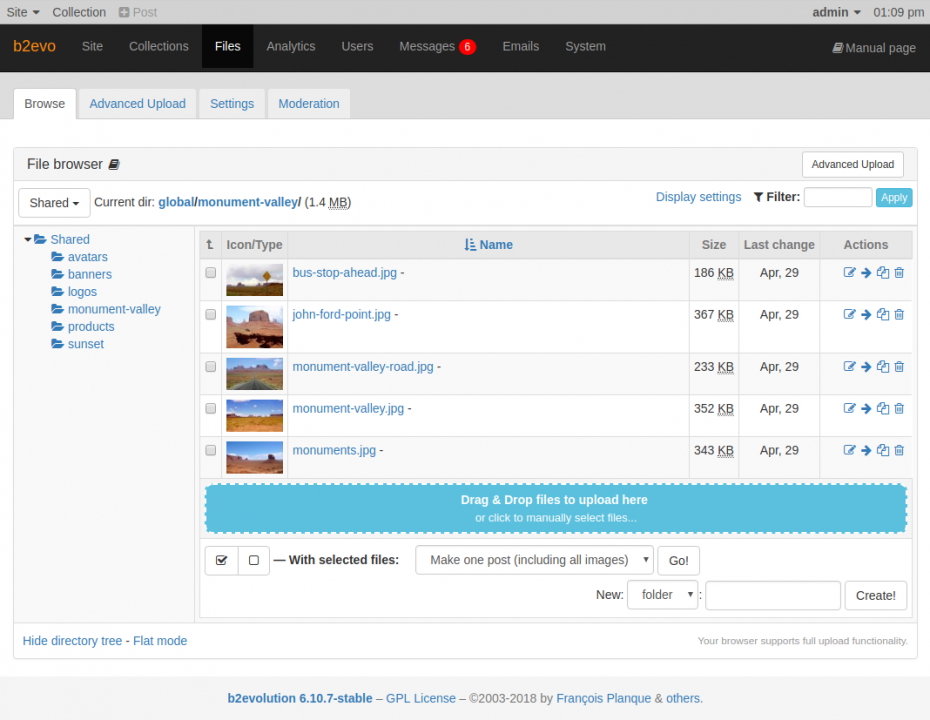
The File Manager also allows you to upload files in the desired File Root and sub-folder, just by dragging them from your computer and dropping them into the remote folder you see on the screen.
Of course there is an advanced permissions system controlling who can uploads and/or edit what kind of files.
Note that if you upload high megapixel images from your digital camera, you can configure b2evolution to automatically scale them down to a more web-friendly size for you.
Server-Side Analytics
The Analytics tabs gives you access to many screens of traffic analytics that b2evolution collects as visitors and users request pages of your site. After a few days being online, your Global Hits Summary might look something like this:

Of course, until you open your site to the public, there won’t be much to see here, except your own activity.
So we will leave it for later to explore all the features of this section. Be sure to come back to it though, as server side analytics can show you many things that remote analytics packages like Google Analytics can’t show you.
User Management
The Users tab is where you can manage registered users, groups and organizations. You can also assign permissions to users or groups that should be given special privileges. By default, b2evolution will have created several demo user accounts for you to checkout:
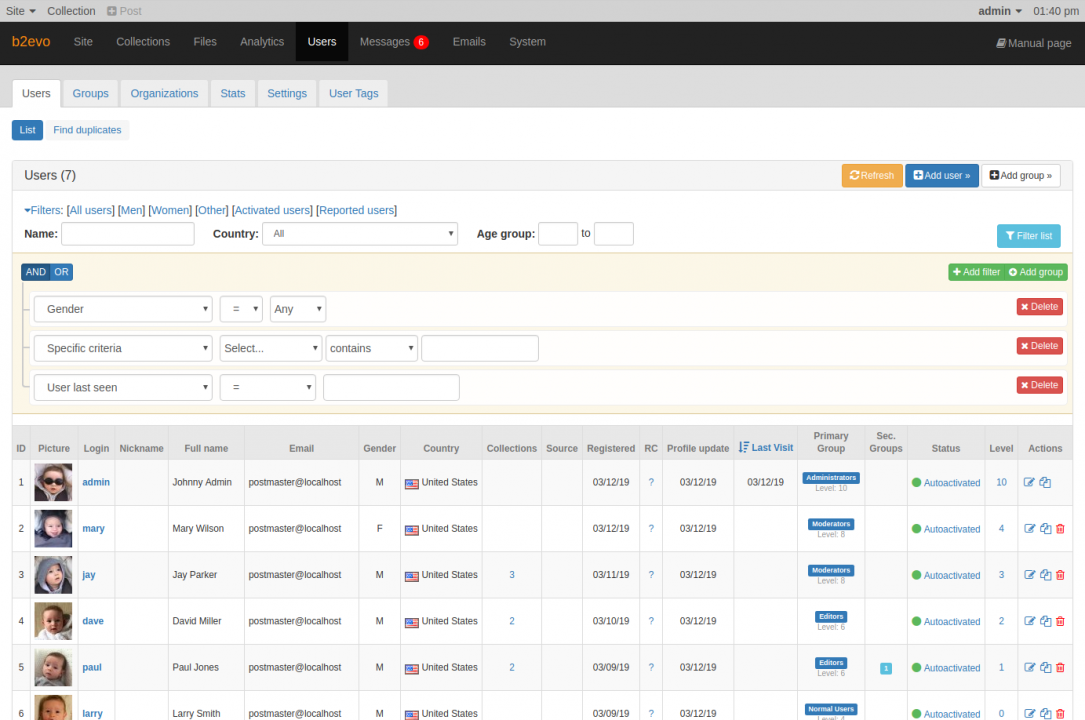
For additional information on how to manage users and groups, please read Editing An Account and Editing User Groups.
User Registration Settings
One important tab is Users > Settings > Registration & Login:
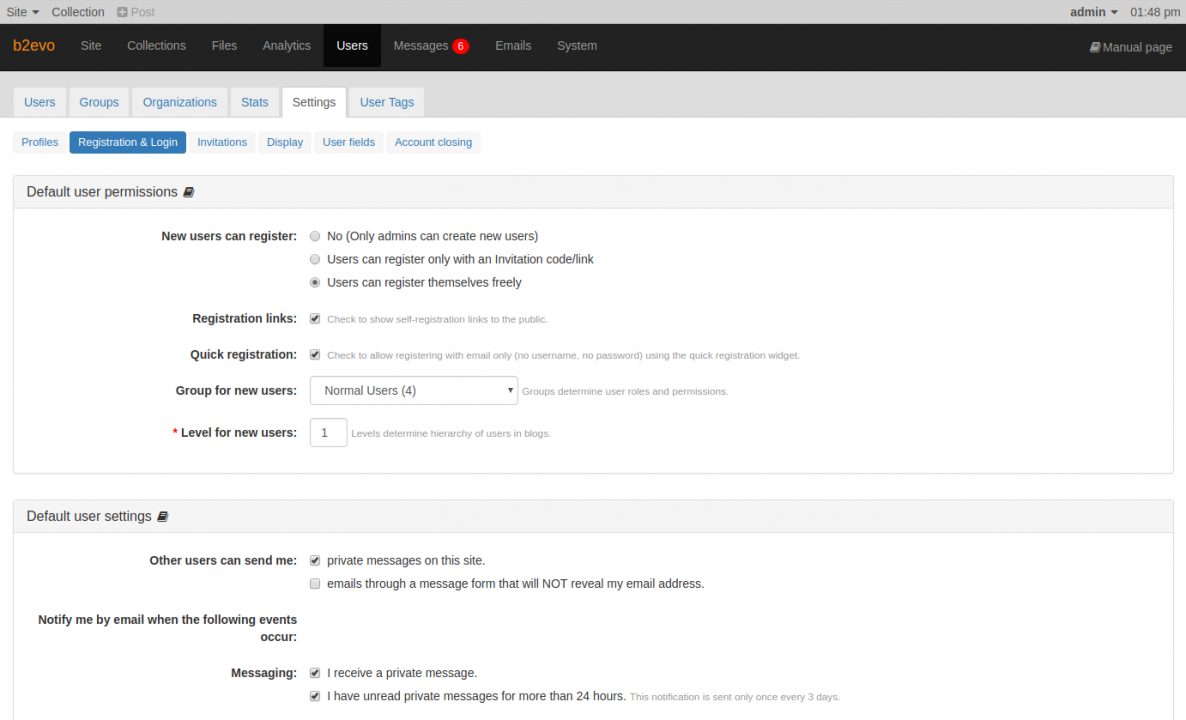
This is where you can enable users to register themselves if they wish to and define the default settings and permissions of new user accounts.
Private Messaging
The next main navigation tab takes you to the Messaging section. Similarly to the front office, this shows you the private conversations you may be having with other users:
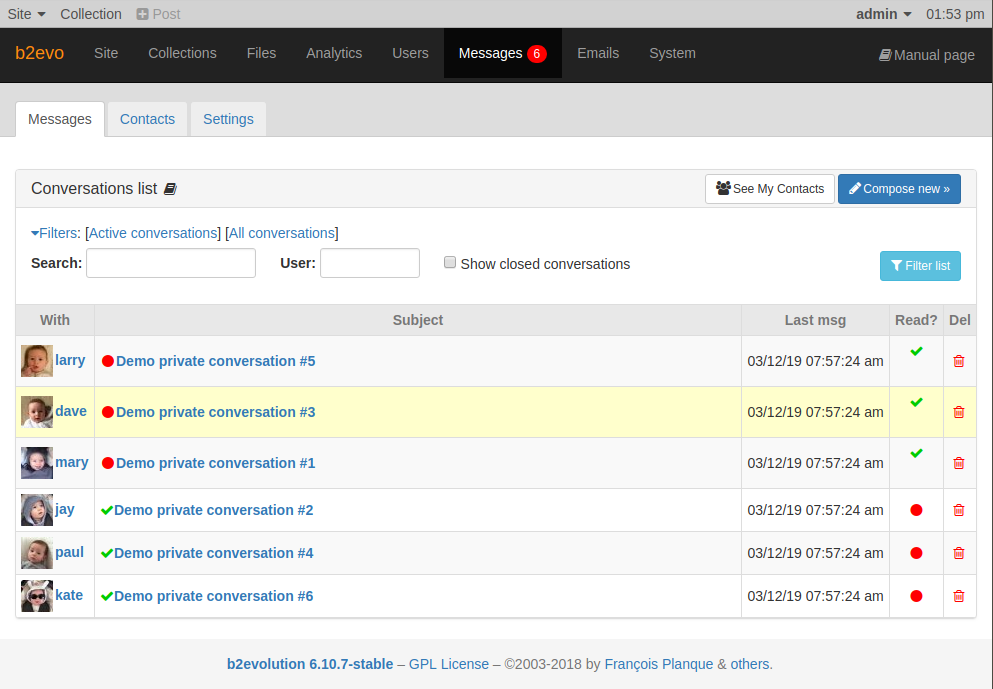
The reason we have this both in the front and the back-office is that sometimes you want to use private messaging only between administrators and moderators of a website but not make it a public feature.
Email Campaigns
The Emails tab is where you’ll find everything about b2evolution’s send and receive email management.
The default screen shows the available Email Lists that users can subscribe to or unsubscribe from. Shown below is the Emails > List > Campaigns tab that displays a list of Email Campaigns:
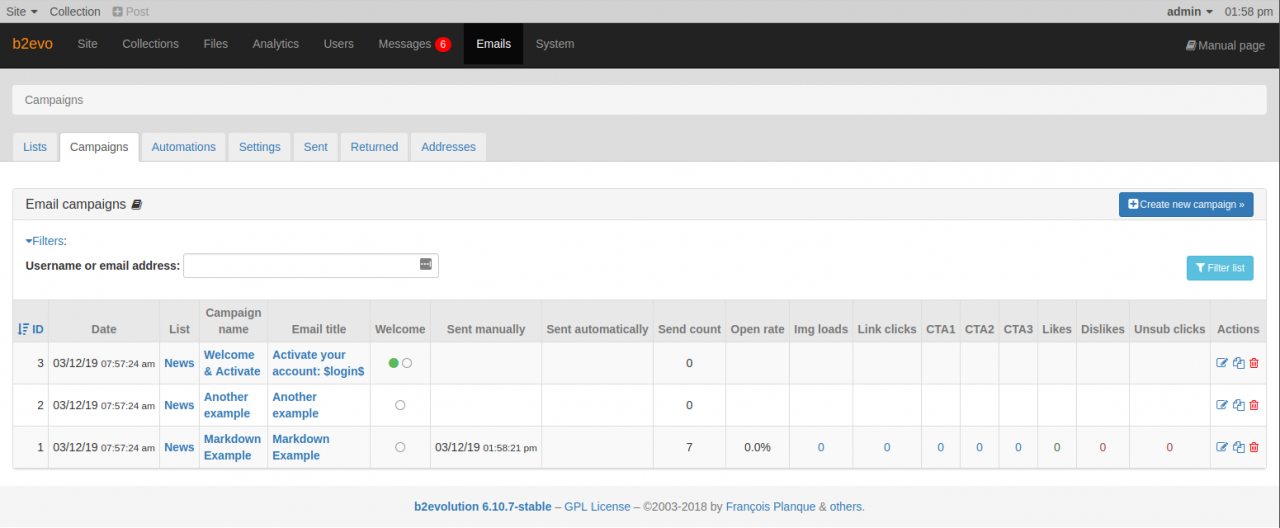
The other tabs allow you to manage the transitional emails (e.g. "Activate you account") and notifications (e.g. "You have a new private message") sent by b2evolution to the users. It also deals with delivery problems and returned emails. This could be a whole book in itself, so we won’t get into details for now…
System Maintenance
The System tab is here to make it easy for you to deal with the various administrative tasks required when operating a potentially high-volume website.
One powerful sub tab is the Scheduler:

This is where you can see all the scheduled jobs that b2evolution will perform silently, sometimes several times a day, other times once per week or per month in order to keep your system and database clean and spiffy!
Another tab you might come to appreciate is the Antispam Tab:

This is where you can block undesirable activity on your website through a variety of vectors: bad keywords, IPs, Domains, Countries and more… but you probably don’t need to worry much about this for now. Just know it’s there if you get annoyed by some spammers on your site in the future.
This concludes this first tour of the back-office.
What’s Next?
By now you might have started clicking here and there to make some edits. We absolutely recommend you do this and play around with your website for a few hours in order to know your way around.
There are many more pages in this manual to give you details about some of the more advanced features.
Also feel free to register with our community forums and use them to ask any questions you might have. Talk soon! ;-)


