- b2evolution CMS User Manual
- User's Guide
- How To...
- Customizing your blog
- How to add custom CSS
How to add custom CSS
With CSS code, you can easily change the colors, sizes, margin, fonts and other presentation attributes of your web pages.
Each b2evolution Skin comes with a CSS file that defines the presentation styles of that skin.
Most b2evolution skins also offer Skin Settings that may include easy ways to modify the presentation of your skin, by automatically generating custom CSS code on the fly.
If these are not enough, there are several ways you can further alter the CSS of your Skin. You will find them below.
The Cascading Style Sheets concept
CSS means Cascading Style Sheets. It means that some styles can be defined in a generic way which can later be overridden by another rule in another Style Sheet. For example, b2evolution’s core CSS files may define that visibility statuses like "Public" or "Community" will be displayed as a round pill. Then another rule will define a different color for each of these pills, without specifying that it is round again. Then a specific skin may actually want to display those as rectangles. It will override the "rounded corners" property without touching the colors.
The reason why skins include generic styles is that when the core adds some news features, for example a new visibility state like "Private" which should display in red, it will immediately be available to all skins, without necessarily needing to update those skins.
Another reasons is to support the wide variety of widgets. It is not possible to expect each skin to have stylings for each widget and to keep up with each new widget that comes out. All widgets not explicitly restyled by a skin will use the styles defined by the core CSS files.
Are you comfortable with CSS?
If you are not comfortable with CSS, a nice way to try out CSS changes without risking of breaking anything would be to use the Developer Tools panel of your web browser. This way, you can test editing CSS properties right in the browser and see your changes immediately. These changes will NOT be saved permanently. The tools are for testing only. However, once you know you can make the changes you want, you can read on to learn how to make such changes permanent.
Option 1: Inject a few lines of additional CSS styles
If you need to add only a few lines of CSS, the easiest/fastest way will be to just inject those CSS styles through your Collection’s Skin and Style Panel Panel, for example:

Another example of this would be: Quickly adding a Google Font.
Pros & Cons
- Pros: This method is very fast and easy to implement and, as you don’t modify your skin files, makes it easy to upgrade your skin to a newer version without losing your customizations.
- Cons: This method would not be efficient if you added several dozens of lines of CSS, because those lines would need to be reloaded with every single page of your site, instead of being loaded just once when a visitor first requests a page on your site.
Option 2: Add a custom CSS file to your skin
With this method you add a CSS file on your server, which will contain all of the custom CSS files you need.
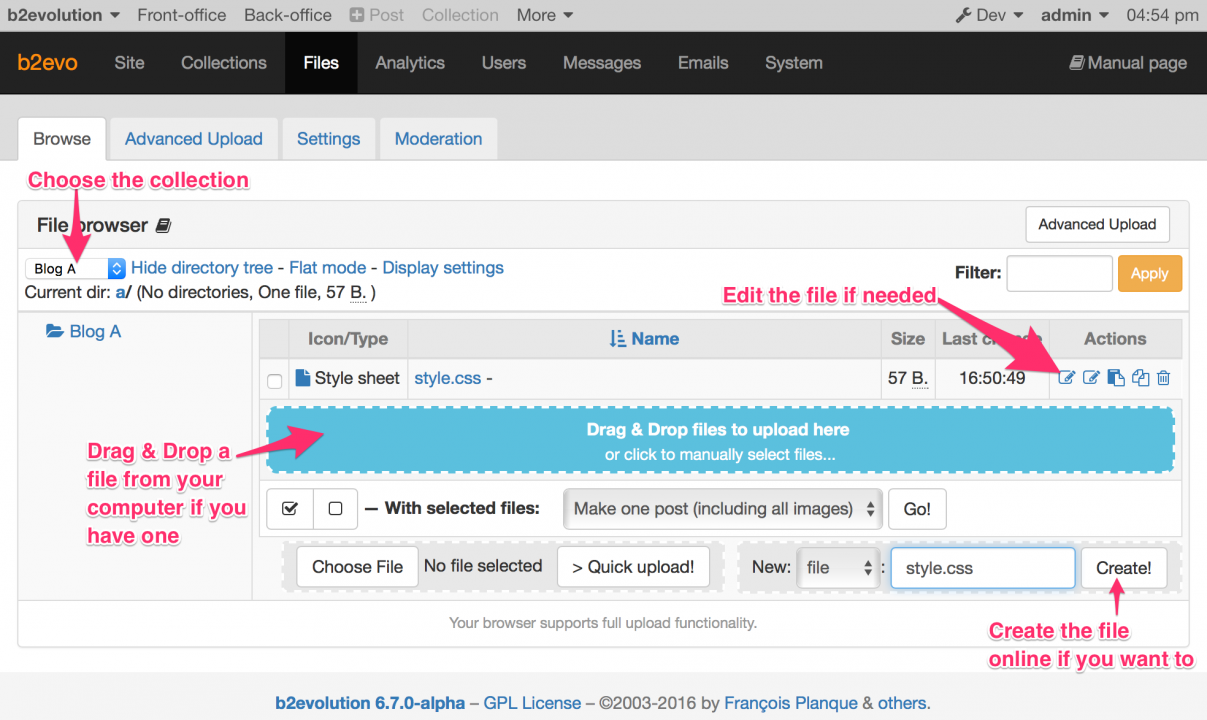
To do this, create or upload a file named style.css in the collection File Root of your Collection:

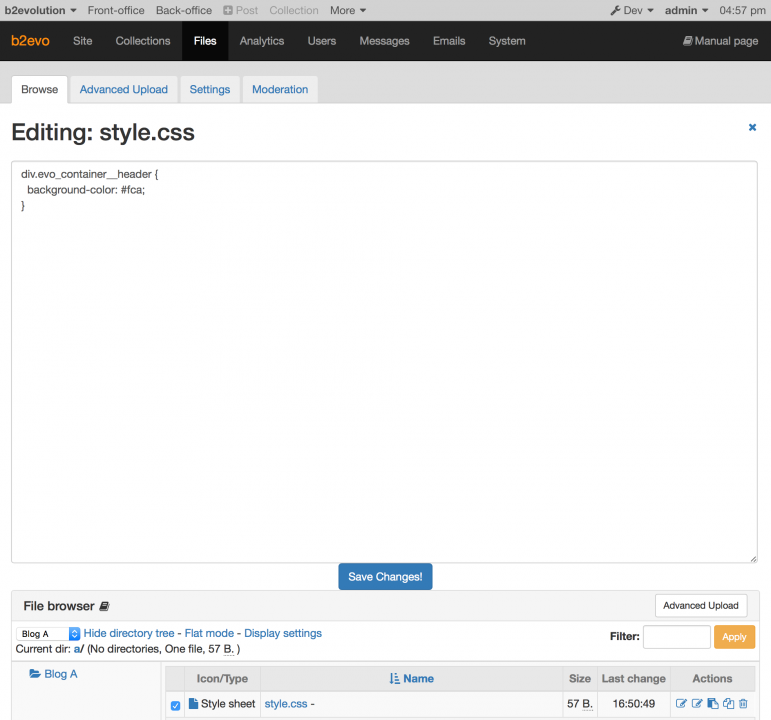
You can use any text or CSS editor to create the file on your desktop computer. But you could also create and edit this file online if you wanted to:

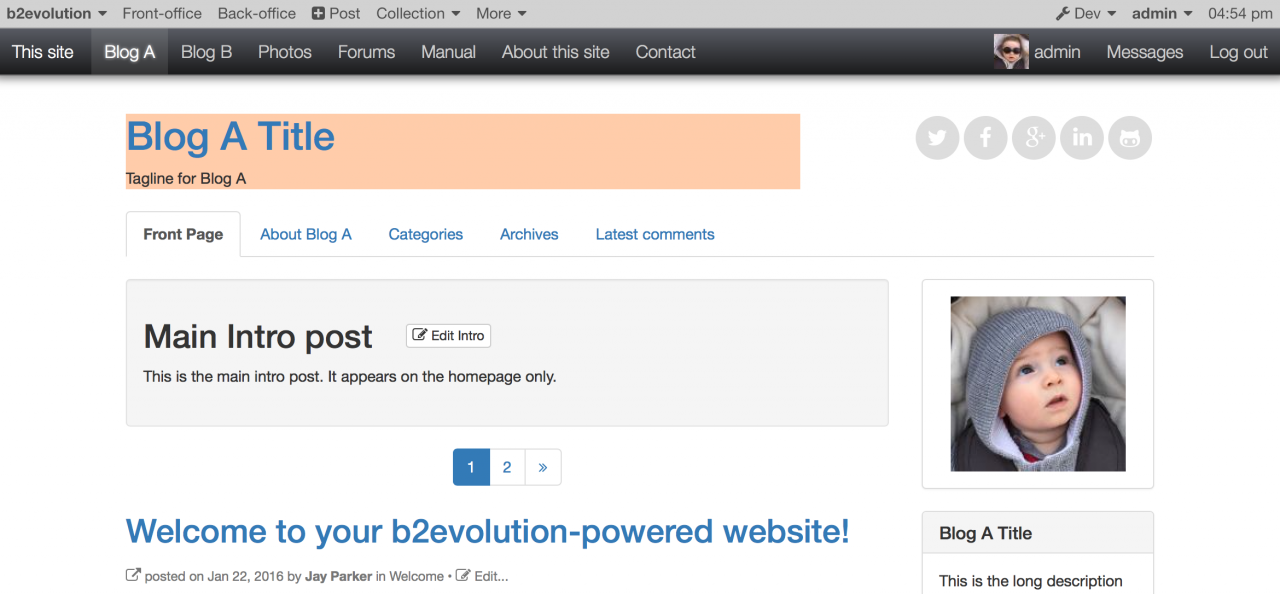
By the way, the file shown above changes the header container background color like this:

Troubleshooting
If your style.css file doesn’t load, check the following:
- Did you upload it into the correct File Root?
- Did you name the file precisely
style.css(and notstyles.cssfor example) - Did someone disable custom CSS files in Collection > Advanced Settings > Skin and Style Panel.
- If you are not logged in, there is a Page Cache that prevents seeing any changes for up to 15 minutes. If needed, you can disable it in the Collection > Advanced Settings > Collection Caching Panel.
- If your CSS doesn’t produce the desired effects, learn to use the browser developer tools. It’s the easiest way to find the best entity/class to apply your CSS to.
- Use a simple text editor or a specialized CSS editor to edit your CSS files. Do NOT use a full-blown word processor for your edits, as it could insert formatting data that you don’t want (and which may break the syntax of your file).
Pros & Cons
- Pros: The custom CSS file will be loaded once when a visitor first requests a page of your site and will not need to be reloaded again after this (unless you modify the file, of course). This makes this method efficient and still allows for easy upgrades of your skin because you did not modify any of your skin files.
- Cons: If you add several hundreds of lines of CSS this way, you may be overriding a lot of the original skin’s CSS styles. Such overrides can become a lot of useless CSS to load in the first place (the styles that will be overridden), and extra work for web-browsers to render. If you find yourself in this situation, you may go the pro route below.
Option 3: Directly edit the CSS files of your skin
This options allows for maximum flexibility and performance, but it will also require you to spend a little time understanding how a b2evolution Skin works.
First, we would recommend you read the Skin Development Primer which will walk you through understanding and customizing a (modern) b2evolution skin.
Then, before modifying a stock skin, you should duplicate the skin, so that all changes you make are safely made on your own copy of the skin. This way, future b2evolution core or skin upgrades will not overwrite your changes.
This is all explained in greater detail in the Skin Development Primer, section: "Starting your own skin" > "Duplicate and Rename".
If this sounds too complex or scary, by all means, please stick with Option 2 above.
Now, once you are working on your own copy of a (modern) skin, you will probably find that, like most modern web designs, the skin uses compiled CSS.
This means that there are several different files involved:
style.lessorstyle.scss, which is LESS or SASS code and which has been compiled (processed) into:style.css, which is normal CSS code, which in turn has been compressed (minified) into:style.min.css, which is the optimal, best performance CSS file your website can load.
The skins that come with b2evolution use Grunt for compiling. Other skins, may have used other tools.
If you don’t know how to work with Grunt, LESS/SASS pre-processors and minifiers, you should delete style.less or style.scss as well as style.min.css from your skin’s folder.
You are then clear to edit style.css.
This is all explained in greater detail in the Skin Development Primer, section: "Changing the skin design" > "Experiment with CSS".

