

Comment from: C BRUNO


b2evolution is a free, powerful software engine that will allow you to build a full-featured public or private website (including intranet/extranet), and manage it efficiently over time.
If you wish so, b2evolution can also manage multiple sites, sub-sites or domain on a single installation.
b2evolution has a long history of being "self hosted" software. That means that before you can use it, you need to install it on a server.
If you’d like a guided tour before installing, go to the Guided Tour.
Now, if you’d like to install the full-featured self-hosted version of b2evolution, read along:
If you are starting from scratch, this short guide will tell you what you need to know in order to successfully install b2evolution for the first time. It might look a bit long but actually, we’re just going to explain in great detail 3 simple things:
You might ask… why bother with installation? Why is this not SaaS?
The answer is simple: b2evolution’s philosophy is that you should be in total control of your site. You should be able to
A self-hosted, open-source solution like b2evolution CMS guarantees all of that. (Contrary to sign-up services/SaaS, which take 90% of the control away from you and slap you with a 10 page long Terms of Service agreement…)
You own your contents, your posts, your images, your personal details. If you were to sign up with an online service instead, in order to publish your data, you would be giving up some of your privacy and some of your property rights, you would never fully control who accesses your private data or not (the classic Facebook problem) and you would never have an opportunity to move your stuff somewhere else, in case things go wrong.
With b2evolution, you own the system that contains your data.
Now… being in control actually requires a minimum amount of effort to… well… be in control.
Sounds good? Let us guide you through the installation of your b2evolution powered website.
Installing on your own computer can be useful in several situations, for example:
But, installing on your own computer also means you need to install extra software on your computer in order to make it simulate a web server (which, by default, it is not). If you want this, you will find instructions for installing locally here.
If you want to install b2evolution on an intranet, you are probably an IT professional already. Just let us point you to some relevant information for configuring b2evolution for intranets: Intranet setup.
Finally, installing on a live website requires that you do have a real website to begin with. Read on to learn how to get one…
For a live website, you need a domain, something like awesome-domain.com. This will be used to form the base address (base "URL") of your website, for example: http://www.awesome-domain.com. (Note: b2evolution can actually run many domains and many websites on a single installation, but let’s just start with one for now.)
You also need a web hosting account. This is an account on a computer (a server) which is connected to the internet 24x7, waiting to serve pages to whomever tries to access your website.
When you sign up for a web hosting account, most hosting companies will offer you to register a new domain name at the same time. They will also let you use a domain you might already have purchased in advance (even if you purchased it from someone else). If you don’t have a domain yet, the easiest will be to purchase it at the same time you sign up for a web hosting account.
Now, web hosting accounts come in many different shapes, sizes and prices. You can find more details in this article: Web Hosting 101: How to Get Started FAST!.
b2evolution can virtually run on any webhost which provides a working LAMP platform. LAMP means Linux + Apache + MySQL + PHP. LAMP is the most common web hosting platform available on the Internet. For more details about technical requirements see: System requirements.
Among the thousands of web hosting providers that meet these requirements, you may select one depending on several criteria, depending on what matters to you:
The choice can be a bit daunting. We have tested b2evolution on many popular web hosting providers and selected the best ones for you to consider. Here is our selection of web-hosting offers.All of these are good starter packages which have been tested to work well with b2evolution. Furthermore, most of them will offer automated installation of b2evolution, which will save you some time and let you skip over most of the steps outlined below.
At the time of this writing, one very compelling option is this link, your account will automatically have the "Install b2evolution" checkbox checked. This is called "0-click install" because it doesn’t require any additional click to install b2evolution this way.
No matter which hosting provider you choose and which hosting plan you chose at a given provider, please keep in mind there is a rough correlation between price and performance (which applies both to server performance i-e: page speed and also applies to technical support performance whenever you have a question for them). Therefore it is advisable to avoid free or dirt-cheap hosting which is basically a waste of time. You may start with a $2 or $3 per month promotional plan and upgrade later. To give you an idea about long term hosting budgets: most personal websites run of $5/month plans and most small business web sites on $20/month hosting plans. Large enterprise websites cost much more than this of course. It basically all depends on how many users will be visiting your website concurrently.
The typical signup process with the webhost of your choice goes like this:
At this point, if you enter your domain name into your web browser’s address bar, you should obtain a web page. It will typically say "Website under construction" and maybe show a logo from your web hosting company.
This means that your new web hosting plan is now ready to serve static pages. In this case it is most likely showing the contents of the file index.hml which may have been pre-installed onto your website.
Now, if you signed up through a host with 0-click b2evolution installation such as A2Hosting, then of course you will not see this "Under Construction" page and you will already see your b2evolution website. In this case, you might want to skip ahead to the Guided Tour.
Ig b2evolution is not installed yet, the first thing to do is to check if your web host offers an automatic script installer, which could be used to install b2evolution with minimal effort.
To this end, look into the Control Panel of your hosting account and look for an icon/feature called any of the following: "Fantastico", "Softaculous", "Simple Scripts", "Web Apps", "Software install" or anything similar. If you find something like this, click on it and see if you find b2evolution in the list of the software packages it can install. Depending on the provider, you may find b2evolution under the "Blog tools", the "CMS tools" or the "Forums" category.
When you find the b2evolution package, check that the version is not too old (our current stable version number can be found here) and try it out. This is the fastest way to install b2evolution.
You may be asked where to install b2evolution on your hosted space. We recommend you install it at the root ( / ) instead of a subfolder. This will allow to call your b2evolution website at the root of your domain (for example http://www.your-domain.com), without specifying any subfolder in the web address.
At the end of the installation, you will typically receive an email with your b2evolution admin username and password
For additional details, see: Typical Web Hosting Installation with Automated Installer.
If automated install works, you’re done with installation and you might want to skip ahead to the Guided Tour.
If automated installation is not available, let us show you how to perform a manual installation. It takes a little longer but here’s the good news about it:
You can download b2evolution from the downloads page.
You will notice there are several versions available. For most users it’s best to download the latest stable version.
This will download a .zip file to your computer which you should unzip. This will create a folder called b2evolution. This folder contains a file called index.html which you can double click to get further instructions (sometimes available in several languages) or you can read on here…
To do this, you will use a piece of software called an FTP Client. (FTP means File Transfer Protocol).
If this is all new to you, please follow these guidelines: FTP 101: How to upload and manage files on your web server.
If you know your way around FTP, you can read the short version outlined on the screenshot below:
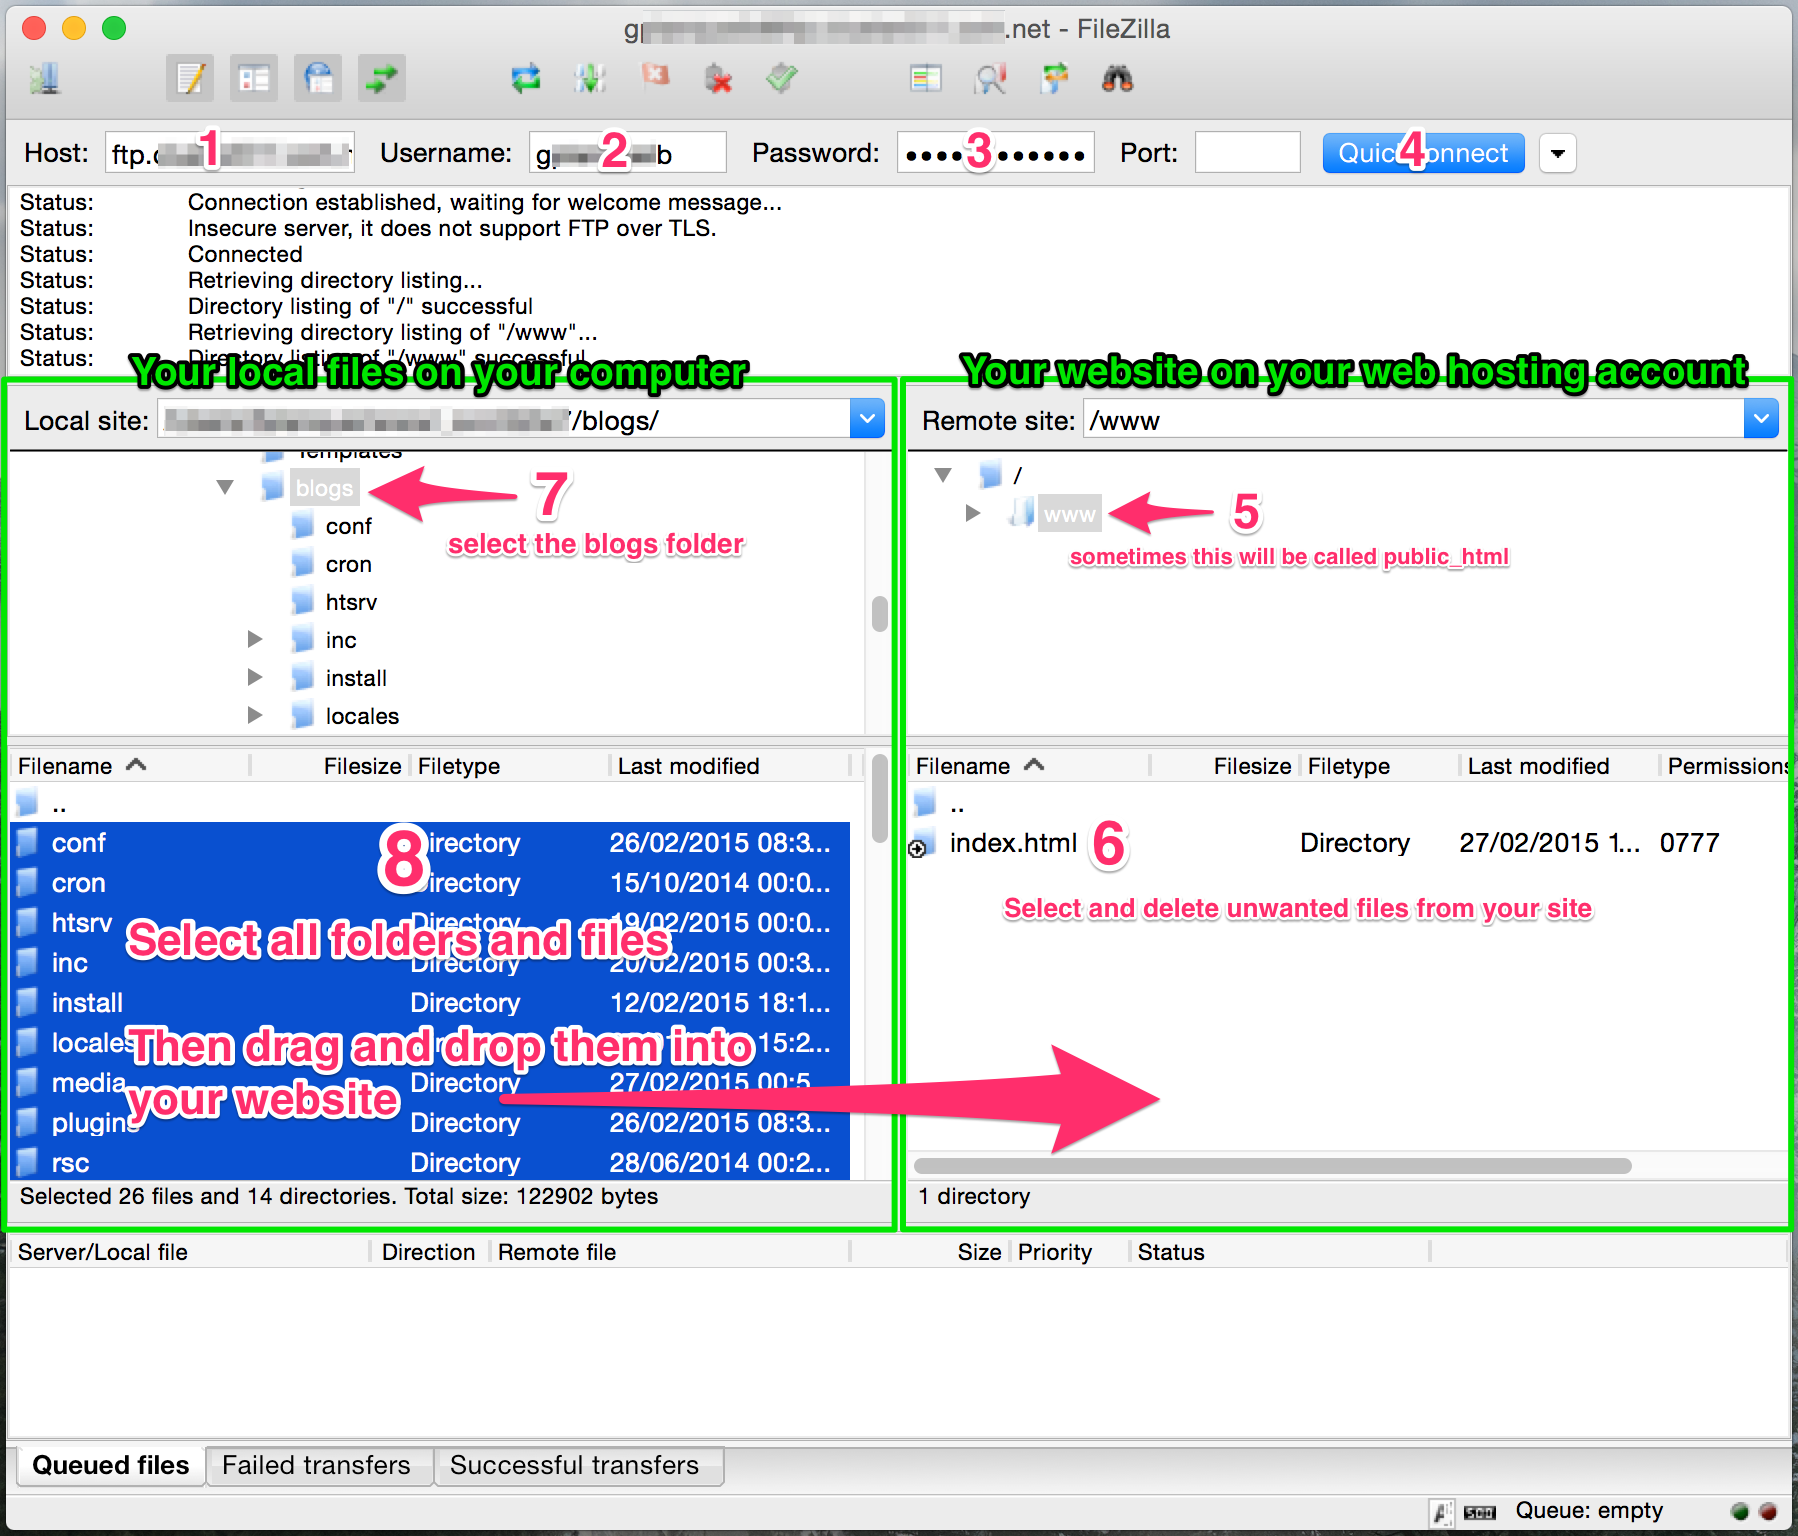
http://www.awesome-domain.com/ and NOT through a subfolder like http://www.awesome-domain.com/b2evo/ or http://www.awesome-domain.com/b2evolution/b2evolution/, etc, you should pay attention to upload the files at the root of your web space. That means b2evolution’s index.php file must go directly into the www (or public_html depending on your host) folder of your web server.x-files on your server, then your base URL for b2evolution will be something like http://www.awesome-domain.com/x-files/. Multiple installations: It is possible to install b2evolution multiple times on a site but this this beyond the scope of this guide. See Multiple instances.
b2evolution is going to handle (a lot of) dynamic content. All this content will be stored in a database. This includes posts, comments, photo captions, usernames, passwords, permissions, private messages, forum messages, etc.
b2evolution uses a MySQL database. Most web hosting accounts offer this as a standard feature. However you may be given the credentials of a MySQL database to use when you sign up OR you may need to explicitly create a new MySQL database. Depending on your hosting account you may be allowed to create 1, 2 or more databases. You only need one for b2evolution (but it should be one with good performance! We’re just saying that in case your host offers some "standard" and some "high performance" databases. Get the hi-perf one!)
So here again, you need to use the control panel of your hosting account to find the icon/feature that allows you to create a new MySQL database (or obtain the credentials of an existing one).
In case your web host is OVH, here are specific instructions for OVH.
Note: if necessary, it is possible for b2evolution to share a database with another web application. It is also possible to install multiple b2evolution instances into a single database. However this is beyond the scope of this guide. See Multiple instances.
In the end you should end up with 4 pieces of information similar to the ones below. Note that most hosting companies will force you to use a predefined prefix for your credentials. In the examples below we will us the prefix xyz_ but yours will be different (if there’s no prefix it’s also ok). So here’s what you should end up with:
xyz_b2evoxyz_b2evo (can be the same as the DB name)localhost or xyz_b2evo.some.thing (this is the basically the name by which your web site can find and talk to the MySQL server that has your database)Copy/paste all that info into a safe place and take a deep breath; the hardest part is over ;)
Now you want to use your web browser and go to the installation script which is part of the b2evolution files you uploaded earlier. If you followed the upload instructions above you should find it at http://www.awesome-domain.com/install/index.php.
This script will ask you for your base url (something like http://www.awesome-domain.com/ if you uploaded b2evolution at the root of your website) as well as the credentials for the MySQL database to use (four strings you saved in the previous step).
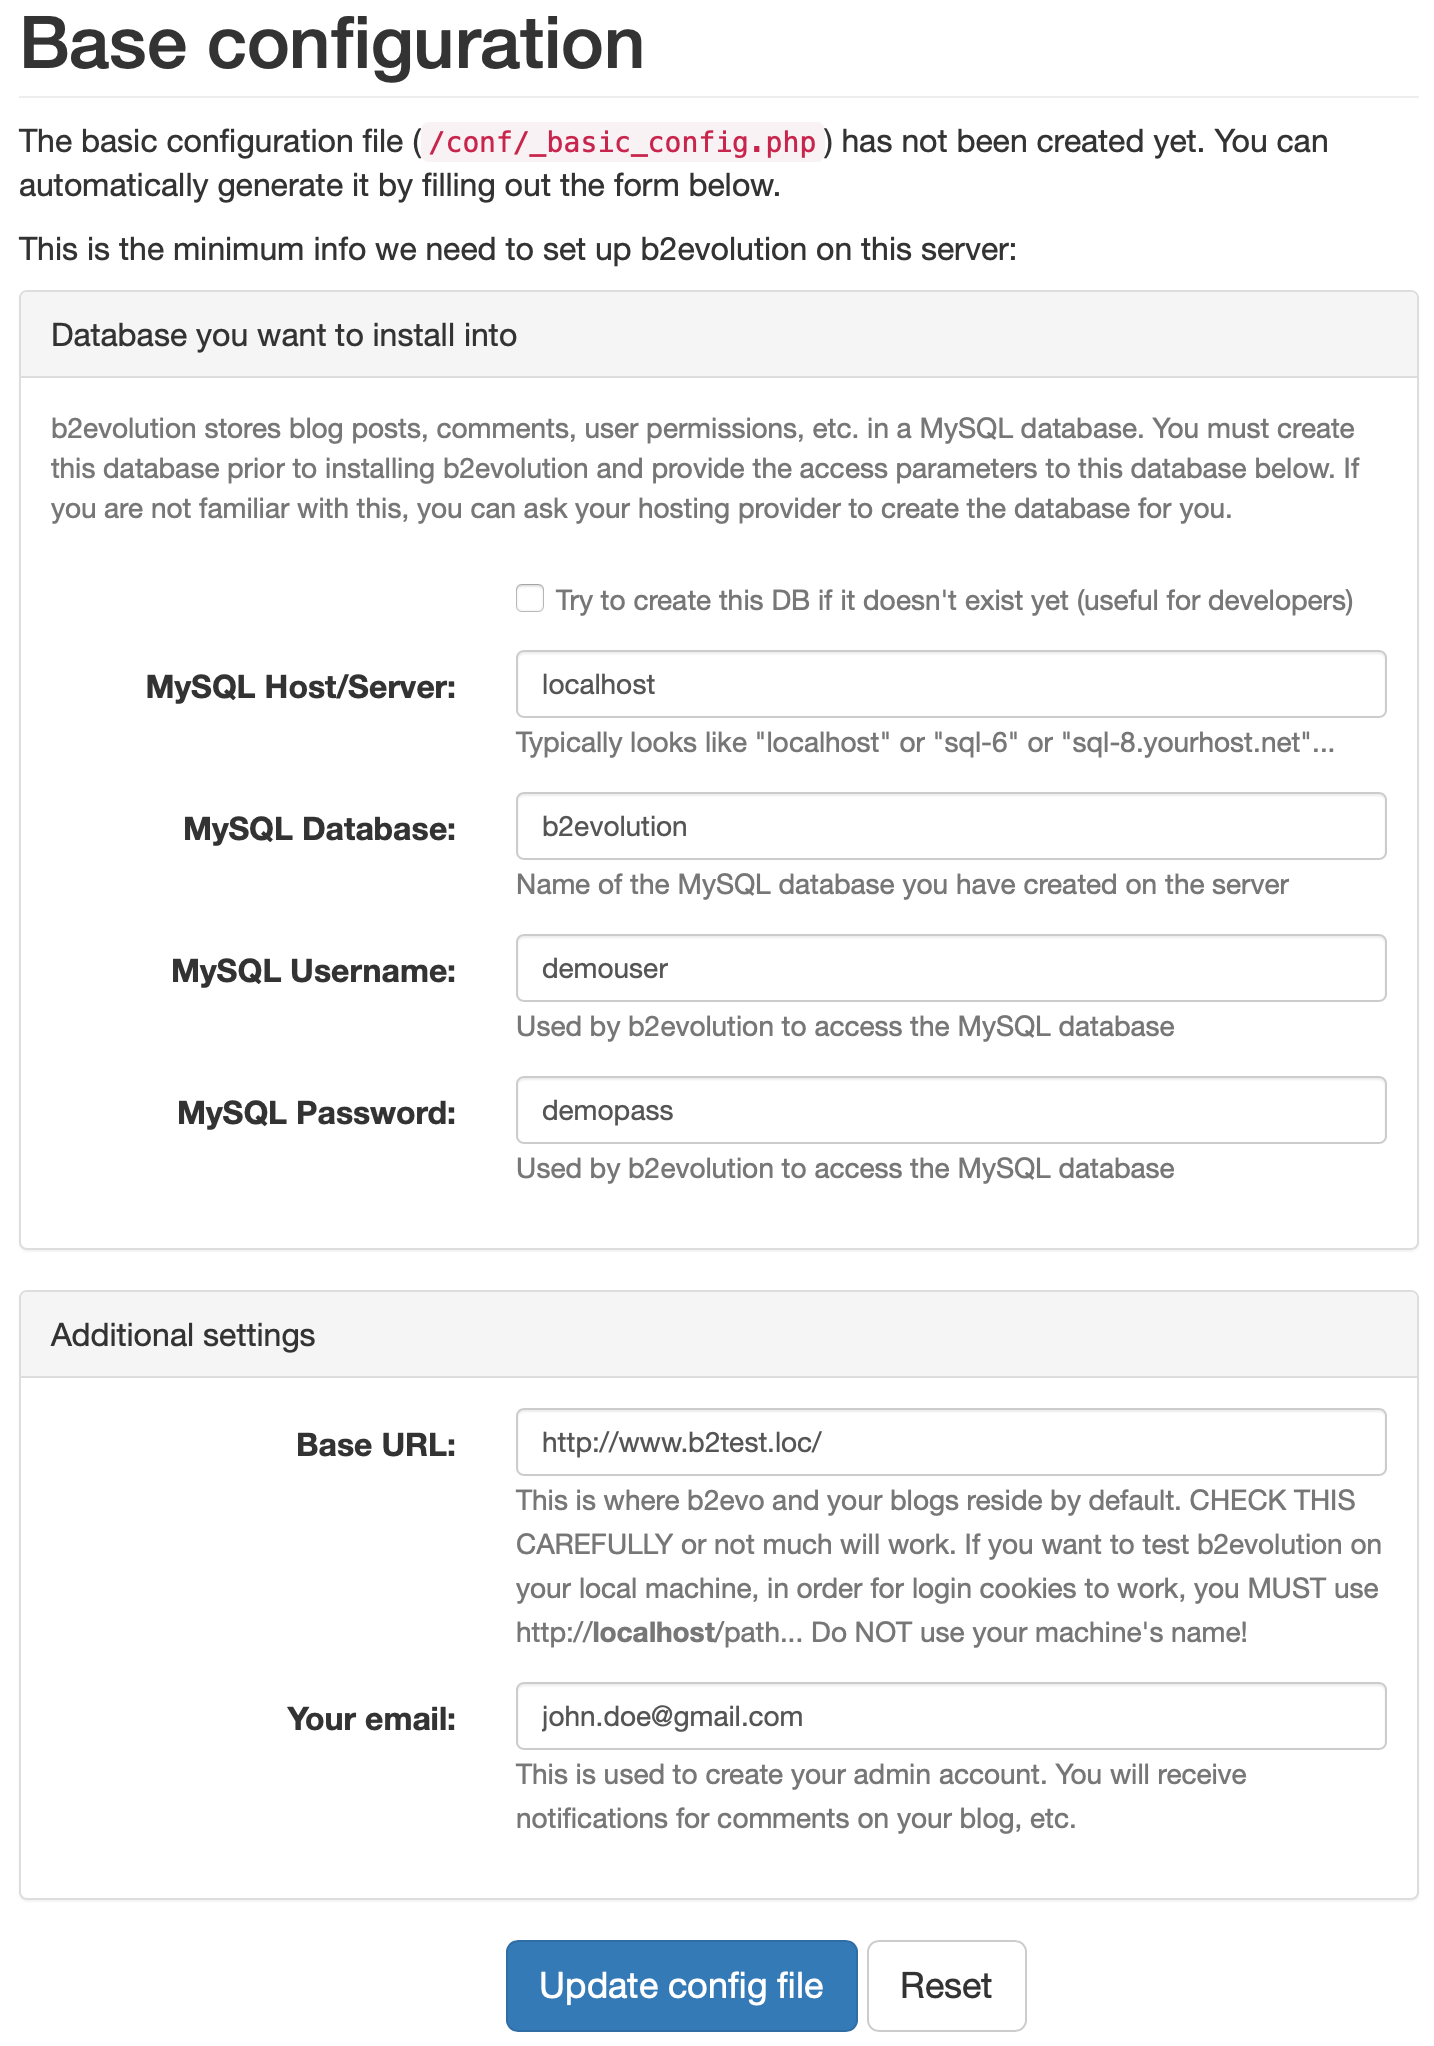
Enter the required information, then let the installer guide you. It should be smooth sailing from there…
When the installer runs, it will display a long list of everything it’s doing. You don’t need to understand everything here, but at the end of the process, you will be presented with your b2evolution administrator "login" and "password", which you will use to access your new blog. Don’t lose these. They can be changed later, but they are required to access your b2evolution back-office.
At this point, if you enter your domain name into your web browser’s address bar, you should obtain a web page dynamically generated by b2evolution. If you installed with the sample contents (which is the default way to install), this will be a demo blog with demo contents (which you can remove later). Otherwise it will be a page generated by b2evolution inviting you to start a blog or any other type of content collection.
At this point, we invite you to follow the Guided Tour.
Just make a note that ideally, you should read the following page some day: After Installation / Upgrade.
In case something goes wrong, here’s a few links that should solve 99% of possible problems:

Thank you for the clear information.One question, are there any plans or provisions already in place for nginx?

Several people are running on NginX. Please search the forums.

instructions for installing locally say to install a local webserver, but nothing about how to use it to install local trial, just says install local server, then go back to main installation guide, which talks only of installing out there on the web…
Can I get any clarification please !?!
(obvious newby, but still confused!)
This page has been amended: https://b2evolution.net/man/installing-locally/
Unbelievable! Can't believe how easy it was to get this set up. After running installation scripts, everything worked just fine. The key was in creating a new MySQL db on the host server and having all the credentials at hand.